Aug 25, 2014

Portobello Eggplant Sandwich


With the vegetarian and/or me working virtually every night this month, my mission has been to find quick, easy and satisfying dinners that will neither require too much prep nor leaving us feeling so full afterwards that we can't go to sleep at a reasonable hour. Last night, that led me down the path of sandwiches. With so much wonderful produce from the greenmarket, I've definitely been on a vegetable kick and I started thinking about grills and, not for the first time, wishing we had one. And what are my three favorite vegetables to cook on a grill? Portobello mushrooms, onions and eggplant. Even though I don't often eat eggplant these days, when I find it fresh and local and organic at the greenmarket, I make an exception.

Alas, we have no grill. But, if you can stand heating up the apartment for fifteen minutes, mushrooms, onions and eggplant are just as (if not more) delicious roasted. And, bonus, you don't have to worry about the bits of onion falling through the cracks of the grill!

I wanted to elevate these from a "typical" sandwich so, while the veggies were roasting, I whipped up a quick tahini spread with fresh basil (better and more nutritious than a more traditional mayonnaise or, worse, ketchup). We also served these with some big arugula leaves on sprouted sesame bread and had a salad on the side. Bon appetit!


 Portobello Eggplant Sandwich

Sandwich

Spread
Preheat oven to 375. Arrange mushrooms, onion and eggplant on a foil-covered baking sheet (or two). Roast 15 minutes.

Meanwhile, make the spread by blending together all ingredients in a food processor until creamy.

When vegetables are cooked, remove from oven and let cool slightly. Toast bread. Generously spread spread onto half of bread slices and top with 1-2 leaves arugula, 1 mushroom, some red onion and 1 slice eggplant. Cover with second slice of bread. Enjoy!

Links:

Aug 23, 2014

Black Bean and Shallot Salsa


Lately, I've been on a real Mexican food kick. It may be due to the fact that I'm doing my best to avoid eating peppers and corn, which makes eating authentic Mexican food quite a trick. Really, it's impossible to avoid both of those ingredients at a restaurant so I've been adapting many of our favorite foods to my dietary restrictions and, believe it or not, coming up with some really fabulous results!

There's also something about Mexican food that lends itself beautifully to the hot weather we've been having lately! Not to mention an excellent way to use up all those delightful, fresh tomatoes that I cannot seem to get enough of, buying them at every conceivable opportunity. I've been using those especially to make salsa (we got sick of just slicing them and eating them with salt and olive oil) and we currently have three kinds in the fridge. Ooops! I guess you can never have too much salsa; it is one of the vegetarian's favorite snacks after all and he makes sure to keep us well-stocked with chips.

This particular salsa is hearty due to the black beans and also a little sweet from the shallots. I was inspired by a Black Bean and Corn Salsa recipe from Eat to Live, a great all-but-vegan cookbook by Joel Fuhrman that has lots of neat, healthy tricks and ingredients that I don't use nearly as often as I should. Since shallots bring a sweetness, I used them as the other main flavor in the salsa and I really like the results! While wonderful with chips, we also enjoyed it over some sprouted-grain quesadillas. Bon appetit!

Black Bean and Shallot Salsa
inspired by Eat to Live

Place all ingredients except for lime juice, cumin and garlic powder in a food processor and pulse until just combined and desired consistency (this well be a softer salsa due to the black beans and olive oil). Remove and place in a serving bowl. Stir in lime juice, cumin and garlic powder. Serve with raw vegetables or tortilla chips, if desired. Enjoy!

Got leftovers? This is delicious mixed with scrambled eggs.

Links:

Jul 26, 2014

Orange Peach Jam


I always thought that jam-making was an enormous deal -- something that grandmothers from another time did in their cottages on rural routes in middle America. They would pick and cut up fresh fruits, boil them on hot summer nights and then can them, processing the cans with a magic I don't understand and am afraid to master, so they and their grandchildren could enjoy the results in the middle of winter, spread onto thick slices of fresh, warm-from-the-oven homemade bread. Sounds idyllic, no? And so not me.

So I was pleasantly surprised when I successfully made jam and jelly last summer. I didn't can either of them (and I still haven't gone that far) but they were both delicious and I even used pectin when I made the jelly! Lately, there have been wonderful peaches at our greenmarkets and, being unable to walk away from such abundance, I keep bringing them home. And there's just so many I can put into my smoothies!

So I decided to make some into jam. Not wanting to go through a whole big-deal production, I found a recipe on Pure Kitchen for Spreadable Raisin Jam. This isn't cooked at all; instead raisins, orange juice and spices are put into a blender until jammy. It sounded perfect but my peaches needed to be cooked to taste more peachy! So I boiled them with spices and orange juice and then blended them for about a minute and they were delicious! The jam is entirely unsweetened and has a little kick from the spices which I love. It's great as a snack on rice cakes and also spread on gingersnap cookies. Enjoy!

Orange Peach Jam
inspired by Pure Kitchen

In a medium pot, combine all ingredients and bring to a simmer over medium heat. Cook 25 minutes, adding water or additional orange juice if necessary. Let come to room temperature, transfer to a blender (or nutribullet) and blend for about 1 minute, until it reaches desired consistency. Bon appetit!

Links:

Jul 16, 2014

Raspberry Lime Rickey

I was never much of a history buff but, as I get older (and possibly even wiser), I find tidbits of food history more and more fascinating. For instance, while reading Fruitful: Four Seasons of Fruit Recipes, a delightful new cookbook by the people behind Red Jacket Orchards, I discovered that Lime Rickeys, a drink I had previously associated with 1950's soda fountains and egg creams, were once an alcoholic cocktail. Suddenly, rickeys got a lot more interesting!

I admit -- I've never actually had a lime rickey so perhaps I'm not qualified to make my own version. But I was always put off by their disturbing green color and the bubbles. See, my aversion to soda is not, as one might expect, because of its processed ingredients or high sugar content but rather because it's carbonated. I never liked carbonated drinks as a child and so never had them. Of course as I've gotten older, there have been some notable exceptions: the aforementioned egg creams, Jack and Cokes for a brief period in college, champagne and, most recently, ginger beer.


So when I saw this recipe and wanted to adapt it to my palate, I knew that ginger beer would be a welcome addition. I have to admit, I have been unable to find a ginger beer without added sugar (if you know of one, please share!) so feel free to make it with soda water if that's a concern for you. The bourbon whiskey is optional as well -- with it becomes an intricate cocktail; without it's a refreshing pick-me-up. You could also make it with gin which is, apparently, the more modern rendition. And if you can get your hands on some black raspberries (they were at my greenmarket), use them. They're absolutely incredible this season. Bon appetit!

PS -- It turns out I'm on-trend! Did you know July is Rickey month?

Raspberry Lime Rickey 
adapted from Fruitful: Four Seasons of Fruit Recipes


In a small saucepan over high heat, combine raspberries and molasses. Bring to a boil and then lower heat and simmer 5 minutes. Remove from heat. Mash raspberries and let come to room temperature. If desired, strain (I don't mind the raspberry seeds).

Fill a cocktail shaker with ice. Add raspberry puree, lime juice and bourbon or gin (if using). Shake and pour into glasses. Top with soda water or ginger beer.

Links (who knew this was such a popular combination!):


Jun 17, 2014

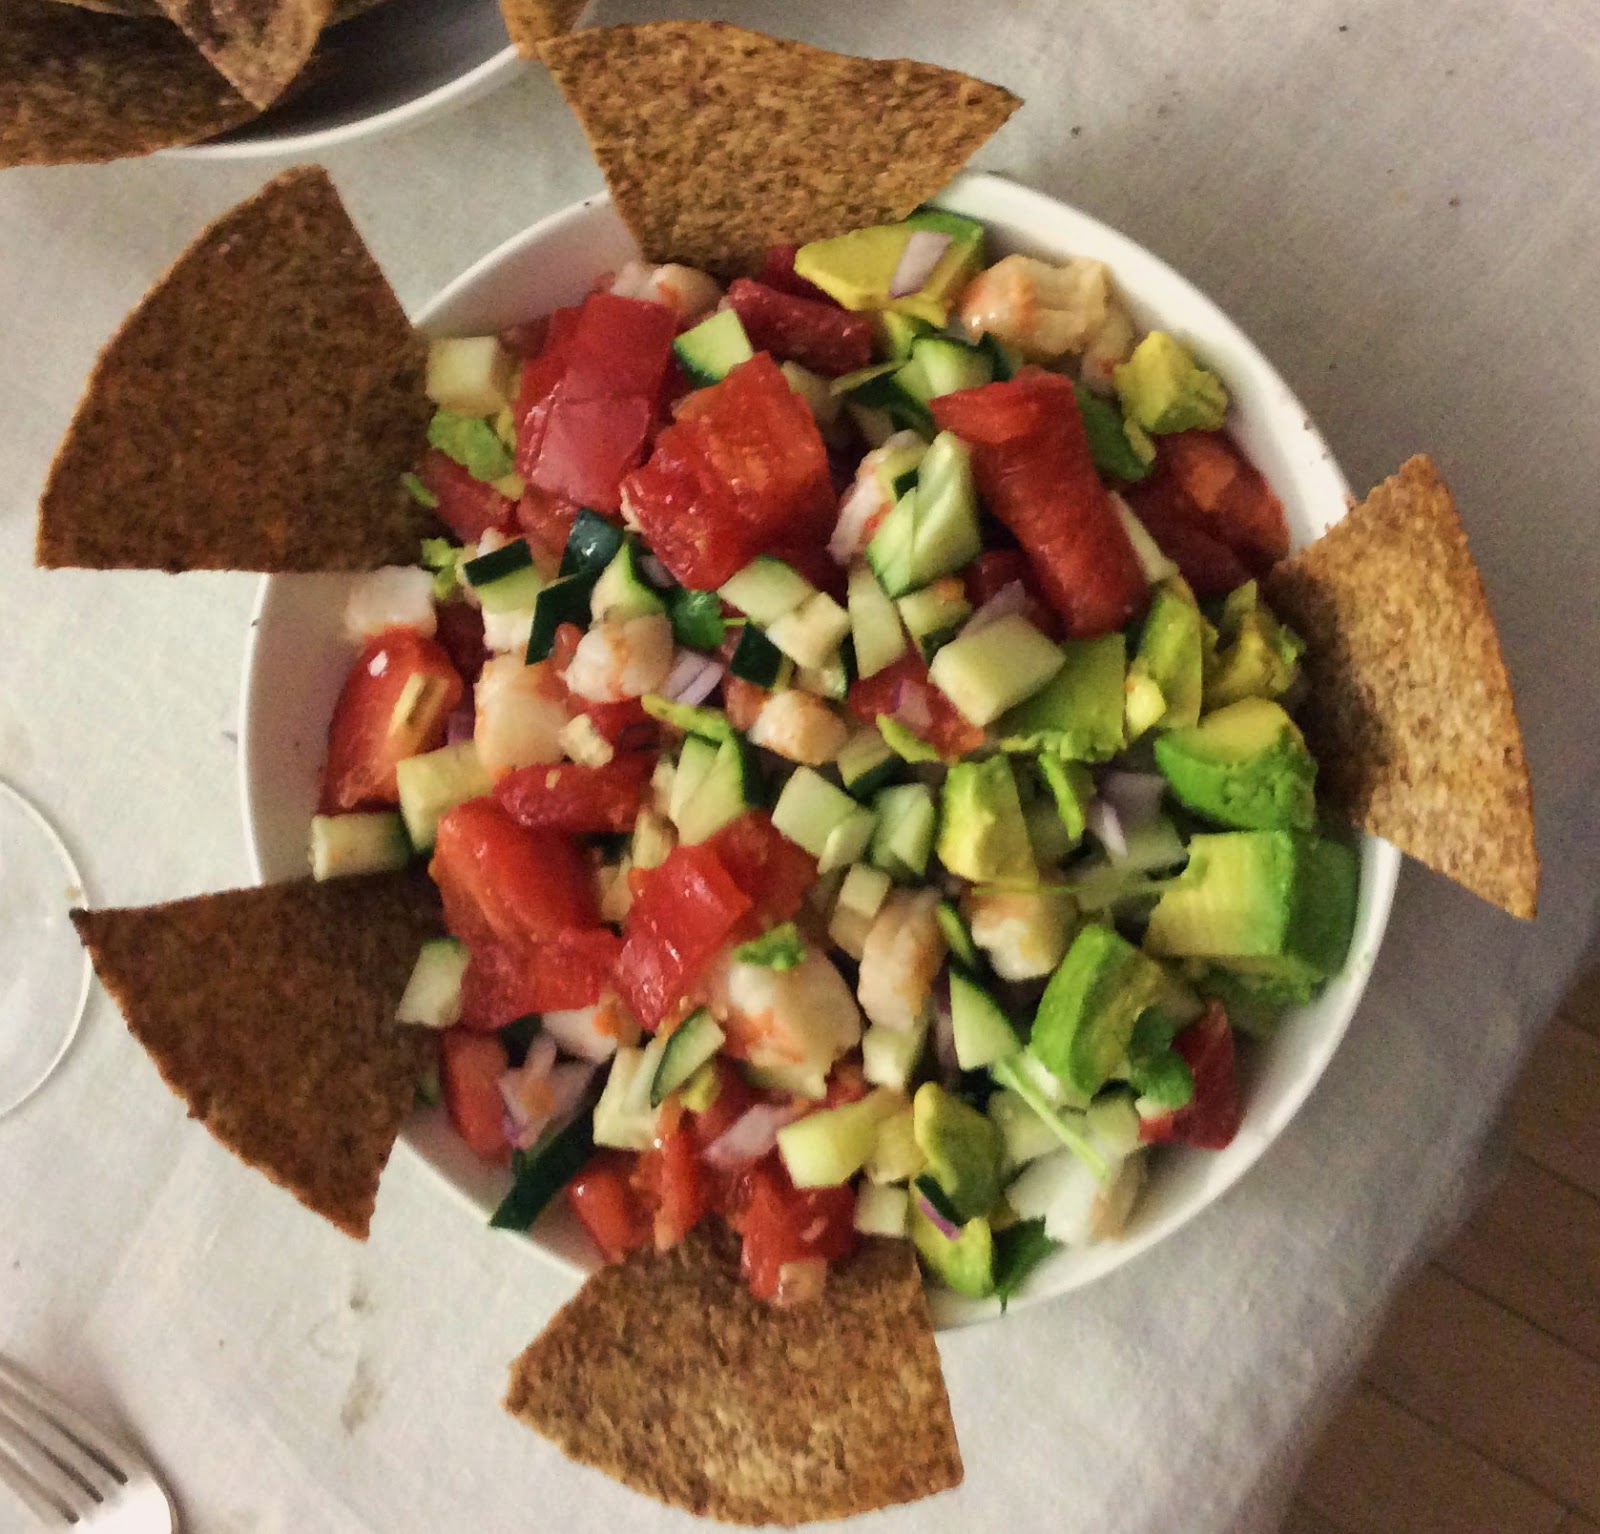
Lime Shrimp (or Tofu) "Ceviche" with Masala-Dusted Tortilla Chips


Happy Summer! I know -- we still have a few weeks astronomically-speaking but I just can't wait! And with temperatures in the 80s and Memorial Day behind us, I'll ignore the ever-present rain, slip on my sandals, open all the windows and start making summer meals!

Ceviche is, to me, a quintessential warm-weather dish -- barely-cooked light, refreshing fish or seafood mixed with refreshing vegetables and lime juice, what's not to love? And this was a perfect excuse to showcase those first heirloom tomatoes of the season. So why, you may ask, is this a "ceviche" and not just a ceviche? Well, although I have no problem eating raw fish, seafood and even beef in restaurants, I'm always a little nervous about making it myself. So I boiled my shrimp for not-quite two minutes before chilling them and marinating them with lime juice and other goodies.

For the Vegetarian, I used new (to us) tofu cutlets: organic tofu that's already been cooked so you just have to cut it up and either heat it up or eat it cold. Very convenient! 


The one note I'll make with this ceviche is to make sure you cut everything up as small as you can. That makes it easier to scoop up and eat with these homemade tortilla chips, see. Oh and do use fresh lime juice. I'm a big fan of convenience but, in this case, bottled lime juice just won't cut it. I guess that's two notes. Ah, well. Bon appetit!


Lime Shirmp (or Tofu) Ceviche
Masala-Dusted Tortilla Chips
First, bring a pot of water to a boil and cook shrimp for 1-2 minutes, until they just turn pink. Drain and let cool, then chop them into pieces small enough to be scooped up with a tortilla chip. If using tofu, just cut up into small pieces and pat dry.

In a large bowl, coming lime juice and red onion. Stir in shrimp or tofu. Cover and refrigerate 1 hour.

After an hour, stir in cucumber, tomato, avocado and cilantro. Serve with tortilla chips (homemade are best).

For Masala-Dusted Tortilla Chips:

Preheat oven to 350. Lay a tortilla on a cutting board. Brush one side with olive oil. Top with another tortilla and brush it with olive oil as well. Repeat with remaining tortillas. Cut into 8 equal pieces. (Since they're all stacked one on top of the other, this becomes really easy as you can cut them all at once.)

Line a baking sheet with aluminum foil and lightly oil it. Place tortilla pieces on it in a single layer, oiled side up. You may need as many as 3 baking sheets or to cook these in batches.

Sprinkle with salt and garam masala. Bake for 10 minutes, until crispy. Enjoy!

Links:

Mar 25, 2014

Rigatoni with Garlicky White Beans


So here we are several days into spring and I'm still cooking and craving winter foods. And why is that, you may very well ask? Because Mother Nature has decided to ignore the astronomical calendar and instead snow is predicted tonight. That's right, snow. At the end of March.

But instead of whining (or, at least to distract me from it), I've gotten back into the kitchen and revisited a delicious pasta and beans dish I adapted from Smitten Kitchen two months ago but never posted. This was the perfect occasion to remake it, perfect the pictures and write it up! This recipe is hearty and infinitely adaptable. You can use virtually any kind of pasta and any kind of bean. It's a great change of pace from tomato sauces and, even though it's vegan, it's definitely stick-to-your-ribs food. You can serve it with garlic-rosemary oil (instructions below), as we did the first night, but it's also delicious as is, reheated (or not) for leftovers. You can also swirl in a spoonful of pesto, homemade or from a jar. If you are eating peppers, I recommend a dash of red pepper flakes. And if you do want some meat, cook up an Italian sausage (sweet or spicy depending on your mood), chop it up and mix it in with the pasta. Leftovers also make a phenomenal soup. Bon appetit!

Pasta with Garlicky White Beans
adapted from Smitten Kitchen

In a food processor, chop together onion, carrots, celery, 5 cloves garlic, parsley and pepper. (Be careful -- it goes quickly from chopped to pureed.). In a heavy pot over medium heat, heat 1/4 cup olive oil. Add chopped vegetables and sprinkle with salt. Cook 10 minutes, stirring occasionally so they color but don't burn or stick to the bottom of the pot. Add tomato paste, stir, and cook 1 minute. Add water or vegetable broth and scrape up any browned bits from the bottom of the pot. Simmer 5 minutes.

Add beans and 2 other cups water or vegetable broth. Simmer 15 minutes.

While beans cook, boil water and cook rigatoni according to package directions. Drain well, reserving 1/2 cup cooking liquid.

Once beans are cooked and tasty, take out 1 cup and add it, along with 1/2 cup pasta cooking liquid, into food processor (no need to clean it in between uses!). Puree, then stir back into beans along with rigatoni. Mix well.

While waiting for everything to come together, remove rosemary leaves from stalk and crush remaining 3 cloves garlic. In a small saucepan over medium-low heat, heat final 1/4 cup olive oil. Add garlic and rosemary and cook just until starting to color, 2 minutes. Pour hot oil over rigatoni in bowls. Enjoy!

Links:

Mar 21, 2014

Pickled Daikon Radish with Onions


Like many Jewish New Yorkers, I grew up eating pickles. I only liked the sour ones and I would refuse any half-sour or (G-d forbid) raw cucumbers. As I put it, I only liked them when they were all grown up! And the only pickles I liked were pickled cucumbers. While my parents got excited about gourmet blends including dill tomatoes, I scoffed and picked out the pickled cucumbers (or "real pickles" as I haughtily called them).

Well, tastes change over time and now I eat cucumbers at all stages of their lives. I also got introduced to other pickled vegetables, first at Korean restaurants and then, as I explored Body Ecology Diet's recommendations of cultured vegetables. I discovered that lots of vegetables were delicious pickled -- greens, carrots and even beets. (I still think pickled tomatoes are a waste of good tomatoes, though.) And, as my tastes became more refined, I found that I liked a little kick in my pickles, be it from garlic, ginger or, as in this recipe, onions.

So when I stumbled across a recipe in Nourishing Traditions for pickled daikon radish, I was intrigued. Radishes often have a bite all their own (although daikon is much more mild). And, while I had never made pickles myself, this way I could control everything that went into them. And we all know how much I enjoy doing that! I ended up adapting this from a recipe from Vegetarian Times. The original called for jalapenos but, since I'm avoiding peppers, I used onions instead for my "kick". These are sweet and fairly mild -- a great addition to a salad or sandwich or, as I did for lunch today, served alongside some fish and fresh tomatoes. Bon appetit!

Pickled Daikon Radish with Onions
Place daikon, carrots, onions and sea salt in a large bowl. Toss well and let sit 1 hour to draw out excess moisture. Drain well, then transfer to jar(s), packing down well. In a small saucepan over high heat, bring vinegar and lucuma to a boil. Whisk until lucuma is completely dissolved (it has a tendency to clump so whisk or stir to dissolve). Pour liquid over vegetable mixture in jar(s). Refrigerate at least 3 hours. You can store these in the refrigerator for quite a while. Enjoy!

Links: